If you’ve tried to upload immigration evidence to myUSCIS and watched the portal silently reject the file — or worse, accept it and then issue a Request for Evidence three months later — you already know how unforgiving the upload step is. The current per-file ceiling is 12 MB, USCIS only accepts a narrow set of formats, and an oversized or wrong-format file can quietly add months to your processing time through an RFE. This guide walks through merging your evidence images and PDFs into a single, USCIS-compliant PDF using xconvert’s free merge tool. Every recommendation is tied to an actual USCIS rule, not a guess. By the end you’ll have a one-file submission that fits the limit on the first upload.
Quick answer: USCIS accepts a single PDF up to 12 MB per file on most current forms (older portals still enforce 6 MB). Use xconvert’s PDF Merge to combine all evidence pages into one file at default settings — re-order pages, then ‘Merge’. If the output exceeds 12 MB, run it through the PDF Compressor with a 12 MB target.
Jump to a section
- USCIS upload requirements — what most guides get wrong
- What you’ll need before you start
- Step-by-step: combine your documents into one PDF
- The exact xconvert settings for USCIS
- Verifying your output before upload
- Common USCIS-specific gotchas
- FAQ
USCIS upload requirements — what most guides get wrong
The single most important number for this whole exercise is the per-file size limit, and the public information about it is genuinely confusing. Many tutorials still cite 6 MB because that was the limit on older USCIS form portals. Per the current uscis.gov filing-tips page, the limit is now 12 MB per file for myUSCIS uploads. The 6 MB figure isn’t completely dead — some form-specific upload flows still enforce it — but the headline number you should aim for is 12 MB, with 6 MB as a conservative fallback if your form rejects a larger file.
Here’s what actually applies, by scenario:
| Form or scenario | Per-file size limit | Accepted formats | Worth knowing |
|---|---|---|---|
| myUSCIS portal — current (most forms) | 12 MB | PDF, JPG, JPEG (some forms also TIFF) | Per uscis.gov filing-tips page |
| Older form-specific portals | 6 MB | Same | If your upload fails at 6 MB+, you’re on an older flow — drop quality |
| RFE response upload | 12 MB per file, 5 documents per submission | Same | Two-axis limit, easy to miss |
| NVC visa portal (consular processing) | 2 MB | JPG, PDF only | Different agency entirely — see below |
A few things you almost certainly won’t see in other guides. PNG is not on USCIS’s general document-upload list — the filing-tips page lists PDF, JPG, JPEG, and TIFF (for some forms). Some online photo-upload flows accept PNG, but for evidence documents stick to PDF or JPG. Encrypted and password-protected PDFs are silently rejected — common when you download a bank statement straight from your bank, and a frequent cause of “the upload looked fine but my evidence is missing” RFEs. Re-saving through a merge tool strips that protection.
The biggest source of confusion: most online guides treat USCIS and the National Visa Center (NVC) as the same system. They aren’t. NVC runs the State Department’s CEAC portal for consular processing, with a much stricter 2 MB per file limit and a narrower format list. If you’re filing through travel.state.gov, every recommendation in this guide changes. This guide covers myUSCIS — the immigration portal at my.uscis.gov, not CEAC.
What you’ll need before you start
Before you open the merge tool, gather:
- Your source files. Scanned IDs, marriage certificates, tax returns, bank statements, photographs — whatever evidence the form requires. JPG, PNG, TIFF, HEIC (iPhone), WebP, and existing PDFs all work as inputs.
- The right scan resolution. 300 DPI is the sweet spot for text documents; photos can stay at their original camera resolution. Going above 300 DPI for text wastes file size with no benefit USCIS will see.
- Clarity on which portal you’re using. myUSCIS and NVC’s CEAC are different — confirm before you start.
- Optional: pre-shrunk photos if you already know your camera images are huge. Run them through xconvert.com/image-compressor first using Specific file size with Auto Scale enabled — we’ll cover the exact settings later if you need them.
Step-by-step: combine your documents into one PDF
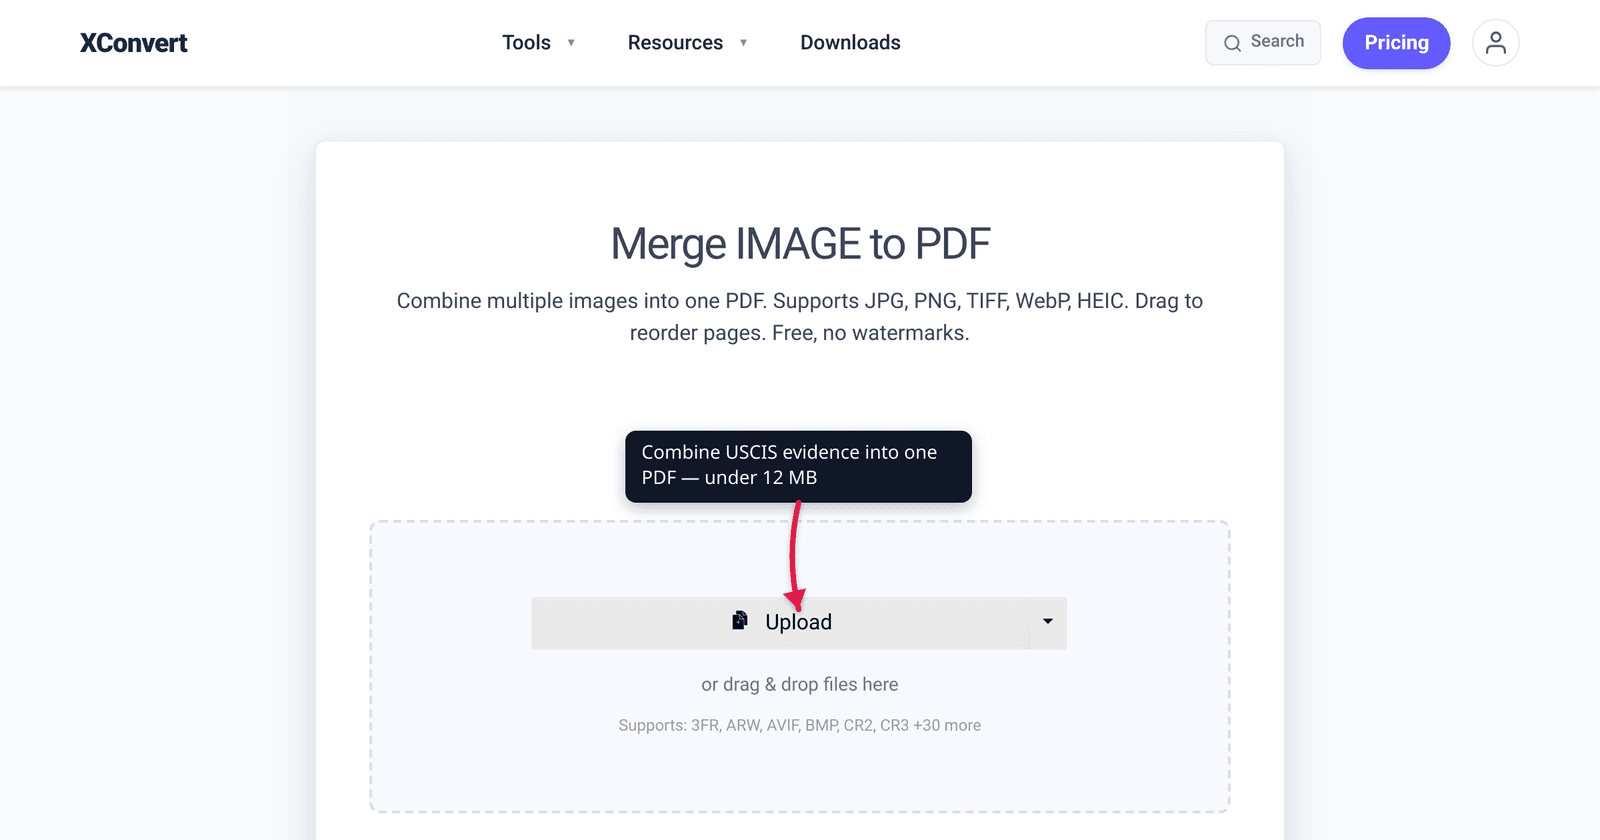
Step 1. Open the tool and add your evidence files
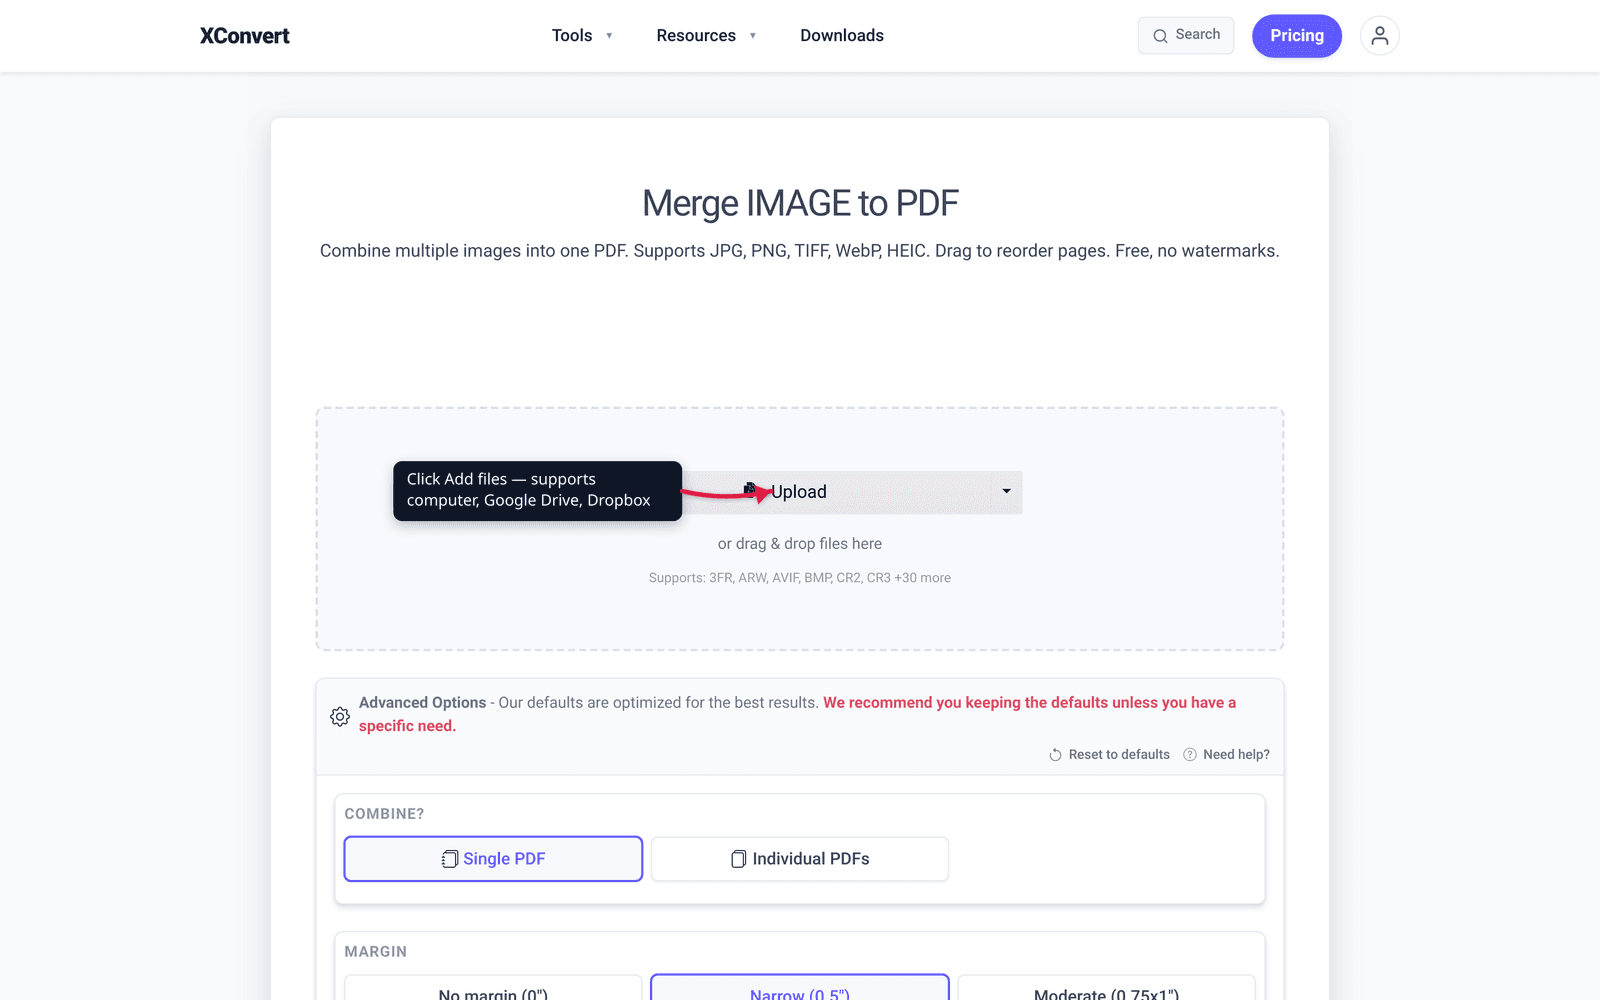
Go to xconvert.com/merge-image-to-pdf and click Add files. The dropdown next to it lets you choose your computer, Google Drive, or Dropbox — for immigration documents, your computer is safest (no extra OAuth handshake). The tool accepts JPG, PNG, TIFF, HEIC, WebP, BMP, GIF, and existing PDFs, plus 30+ raw camera formats. Mix freely: a PDF tax return, JPG photos of marriage events, and HEIC iPhone shots all merge into one output. PNG is fine as a source even though USCIS won’t accept it as a final upload — the output is always a single PDF. The tool runs entirely in your browser, no account required.
Step 2. Reorder pages by drag-and-drop
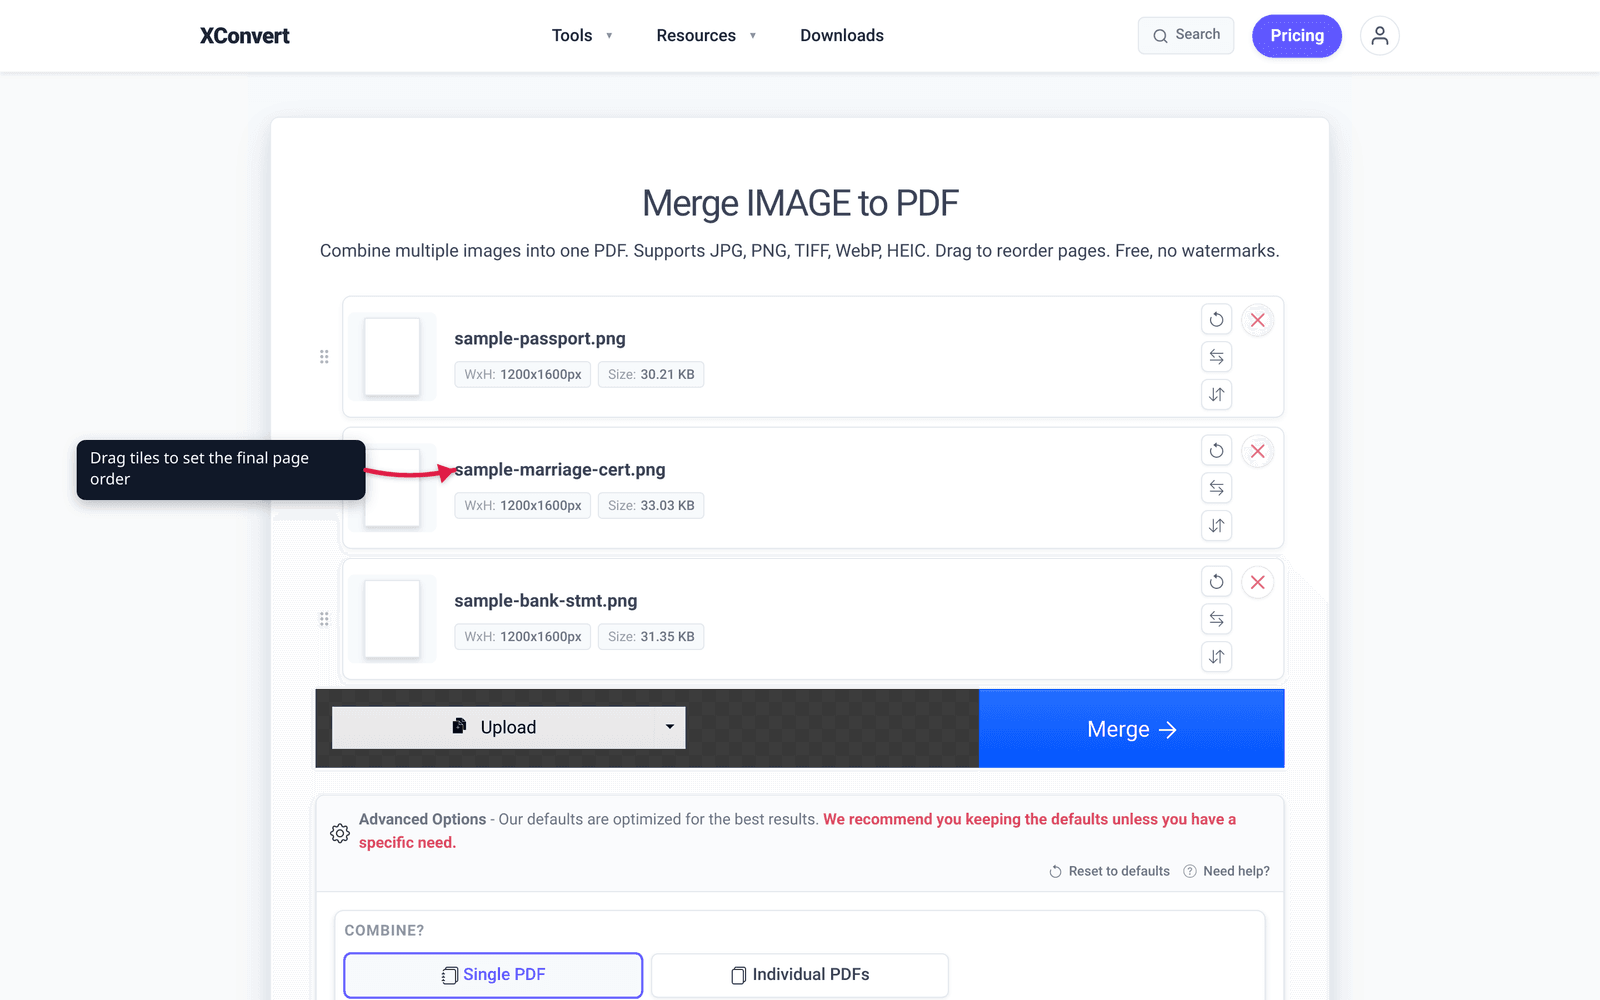
Once your files are uploaded, each appears as a thumbnail in the order you added them. Drag them to set the final page order. For USCIS evidence, a useful convention is: an index or cover page first (if you’re including one), then identity documents (passport, government ID, birth certificate), then supporting documents (marriage certificate, bank statements, photos), with photos and less-formal evidence last. Officers scan top-to-bottom and what they see first gets the most attention. If you’re responding to an RFE that lists items in a specific order, follow that order exactly.
Step 3. Set the USCIS-friendly options
Below the file list, the Advanced Options panel is already expanded with the message “Our defaults are optimized for the best results.” For USCIS, you only need to change three settings from their defaults:
- Margin → click Narrow (0.5″) instead of No margin

- Paper size → click the A4 dropdown and select LETTER

- Image Transparency → click Removed instead of Unchanged
Everything else can stay on the default: Single PDF, Portrait, Contained, Center, Quality Percentage 75. Don’t drop the quality slider unless you’ve already merged once and the output came out over 12 MB. We’ll cover the full reasoning for each setting — and the fallback if 12 MB is still too large — in The exact xconvert settings for USCIS below.
Step 4. Click Merge and download your PDF
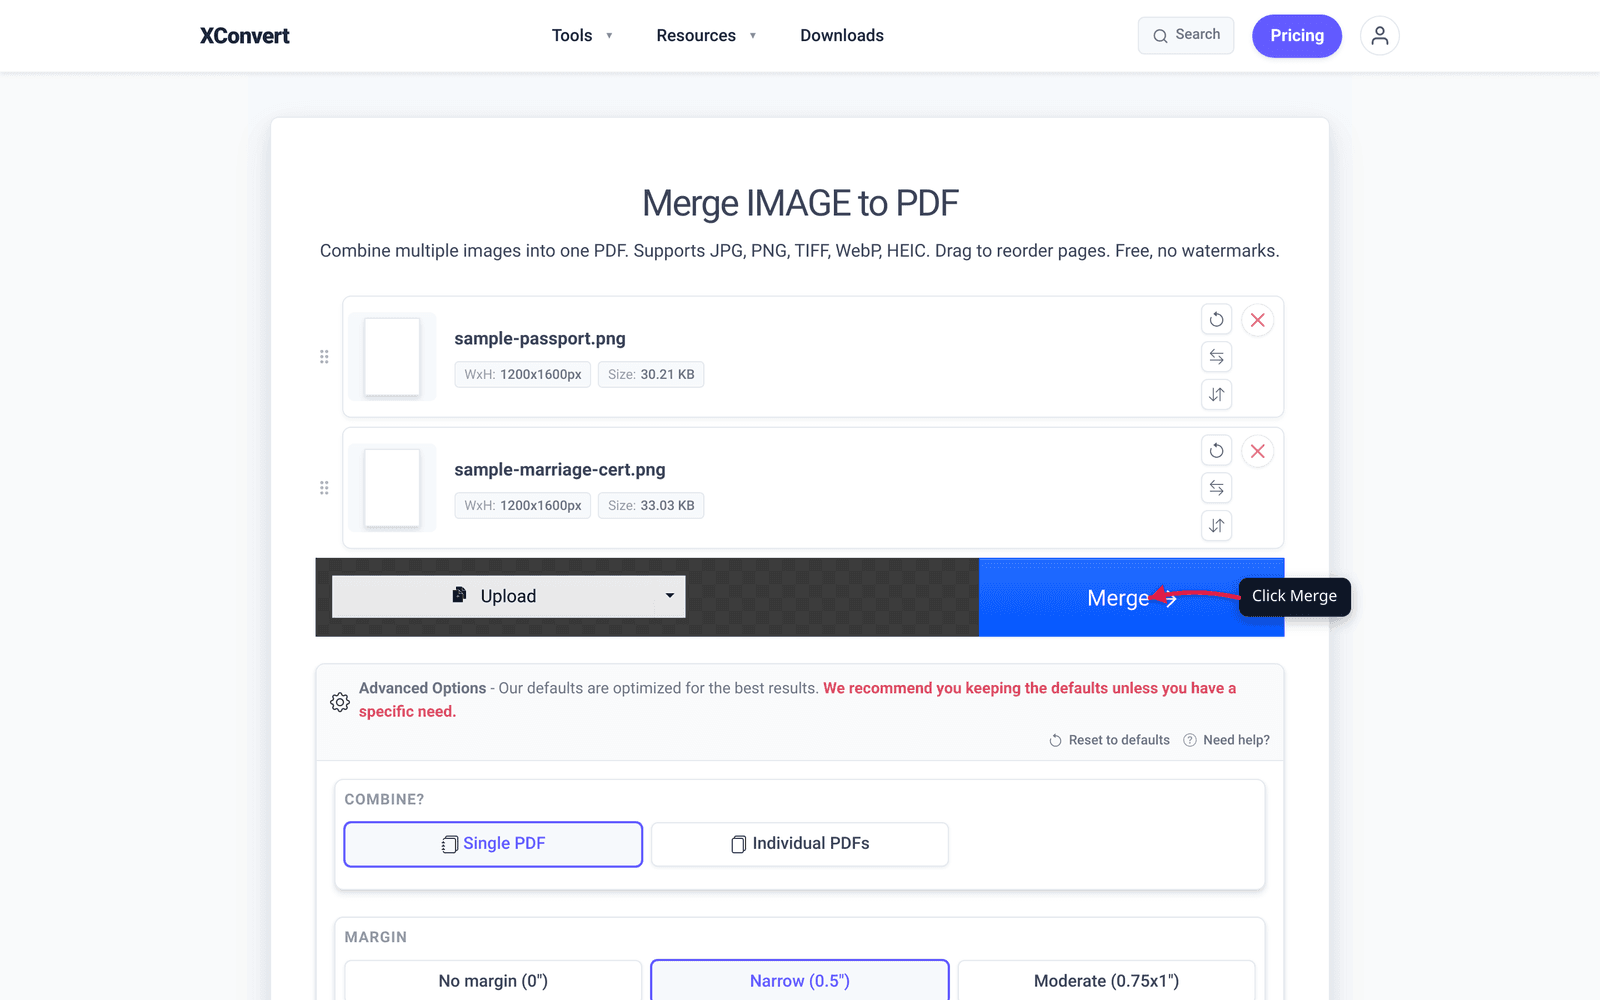
Scroll back up to the file list. Once at least one file is uploaded, a Merge button appears at the bottom of the list. Click it. The tool processes your files in the browser — typically 5 to 30 seconds, depending on how many images and how large they are — and produces a single PDF download. Save it somewhere you’ll remember. USCIS portals occasionally request re-uploads later, and you’ll save yourself a re-merge by keeping a copy. Before you upload to myUSCIS, run through the verification checks in the next section.
The exact xconvert settings for USCIS
Here is every Advanced Options setting, the value to use for USCIS, and why. Every value matches a specific USCIS rule.
| # | Setting | USCIS value | Why |
|---|---|---|---|
| 1 | Combine? | Single PDF | USCIS expects one PDF per evidence item — that’s the whole goal. |
| 2 | Margin | Narrow (0.5″) | A small margin keeps the document legible on screen and survives a print at the officer’s desk. No margin looks fine on a phone but loses content on print. |
| 3 | Paper size | LETTER | US-government default. Most US-domestic scanners output 8.5×11. A4 still works but adds a slight aspect-ratio mismatch when printed. |
| 4 | Page layout | Portrait | Every USCIS form and almost every evidence document is portrait-oriented. |
| 5 | Image placement | Contained | Cover crops the image to fill the page — catastrophic for documents because text near the edges gets cut. Contained scales the whole image to fit. |
| 6 | Image alignment | Center | Centers the document when its aspect ratio doesn’t match the page. Top or Bottom leaves awkward whitespace and can crop perception. |
| 7 | Image Compression (Quality Percentage) | 75 (default) | The 12 MB ceiling has enough headroom for the default quality on most evidence sets. Drop to 60–65 only as a fallback if your merged file is over 12 MB. |
| 8 | Image Transparency | Removed | Older PDF readers — including some versions of Adobe Reader on Windows — render transparent regions as black. USCIS officers use a mix of viewers, so strip transparency to avoid the surprise. |
A few of these deserve a sentence of extra context.
Quality Percentage stays at 75. The plan some other guides recommend — drop to 60 to stay safe — comes from the older 6 MB era. With a 12 MB ceiling, 75 is fine for typical evidence sets. The exception is photo-heavy submissions (e.g., 30+ images of marriage events for an I-130). If your merged output goes over 12 MB at quality 75, drop to 60–65 and re-merge. If it’s still over, that’s the signal to switch to the image-compressor fallback we cover in the next section.
LETTER beats A4 for US filings. USCIS forms are sized for Letter (8.5 × 11 inches). Selecting A4 produces a PDF that looks identical on screen but prints with a thin band of misalignment if the officer prints. It’s a small thing, but a guide that aims to be the authoritative source has to get the small things right.
Transparency Removed is a “weird edge case” rule that bites real filers. A surprising number of users export receipts or notes with a transparent background, and the merge silently composites them onto white. They look correct in xconvert’s preview and in modern Adobe. Then an officer opens the PDF in an older reader and sees black rectangles where the transparency should have been. Strip it.
One-line summary you can save: Single PDF, Narrow margin, LETTER, Portrait, Contained, Center, Quality 75, Transparency Removed.
Verifying your output before upload
Before you upload to myUSCIS, do three quick checks on the file you just downloaded:
- File size is under 12 MB. On Mac, right-click the PDF and choose Get Info. On Windows, right-click and choose Properties. On Linux, run
ls -lh. The size should be comfortably under 12,000 KB. - Every page is legible at 100% zoom. Open the PDF and page through it once. If any text is blurry or any signature unreadable, the issue is the source scan — go back and re-scan that document at a higher resolution, then re-merge. You cannot fix a blurry source in post-processing.
- Pages are in the order you intended. Same order you set in step 3, with cover/identity documents first.
If the file is still over 12 MB, the cleanest fix is to pre-shrink the source images first using the xconvert image compressor, then re-run the merge:
- Open xconvert.com/image-compressor and upload your original source images (not the merged PDF).
- In Advanced Options → Image Compression, click the Specific file size tab.
- Calculate a target per image:
(12 MB ÷ number of images) × 0.85to leave PDF-overhead headroom. For a 6-image evidence set: 12 ÷ 6 × 0.85 ≈ 1.7 MB. Round down to 1.5 MB to be safe. - In the File size box enter 1.5, confirm the unit dropdown is Megabytes, and confirm Auto Scale is checked (it’s on by default — leave it on; it intelligently reduces dimensions instead of just degrading quality).
- Click Compress and download the smaller images.
- Go back to the merge tool, upload the compressed images, apply the USCIS settings from §The exact xconvert settings for USCIS, and merge again.
This two-step path almost always gets you under 12 MB even with 20+ pages of high-resolution evidence.
Common USCIS-specific gotchas
Five things that trip up real filers, drawn from edge cases the official rules don’t spell out clearly.
1. HEIC iPhone photos work as merge inputs but fail as direct uploads. Newer iPhones save photos in HEIC format by default. HEIC is not on USCIS’s accepted-format list, so uploading a HEIC file directly to myUSCIS will fail. The merge-image-to-pdf workflow handles HEIC inputs cleanly — they end up as JPEG-encoded pages inside your PDF — so as long as your final upload is the merged PDF, you’re fine. The trap is when someone tries to upload a HEIC directly, sees the error, and assumes the whole tool chain is broken. It’s just the format.
2. PNG is everywhere on the web but isn’t on USCIS’s list. Most tutorials and tool sites describe PNG as “universally accepted.” USCIS does not list it. You can use PNG as a source for the merge tool — it becomes a page inside the output PDF — but if you tried to upload a PNG file directly to myUSCIS, the system will reject it. Always end with a PDF.
3. Encrypted or password-protected PDFs fail silently. This is the worst kind of failure: bank statements and brokerage statements often arrive password-protected, and the lock travels with the file. USCIS’s portal sometimes rejects encrypted PDFs with a clear error and sometimes accepts the upload but then has “no document” attached — which only surfaces when an officer reviews your case months later. Re-saving the file through the merge workflow strips the encryption. If you only need to upload one bank statement and don’t want to merge, open the PDF in any reader, print to PDF, and upload the printed copy.
4. The new PDF-upload pathway has its own quirks. USCIS rolled out a direct PDF upload pathway for several forms (I-130, I-765, N-400, and others) in late 2025. Two things to watch for: it does not issue an immediate receipt notice — you only learn later if your filing was accepted — and the validator occasionally flags well-formed PDFs as “pages out of order” or “duplicates.” If you’re filing via this newer option, double-check page order before submitting and don’t use it for time-sensitive filings without a backup plan.
5. myUSCIS and NVC are different portals with different limits. If you’re going through consular processing (DS-260 at travel.state.gov), you’re using the State Department’s CEAC portal, not USCIS. CEAC enforces a much tighter 2 MB per file limit, and the format list is narrower. Most general “PDF for immigration” guides conflate the two systems. If your destination is CEAC, recalculate the per-image target in §Verify using 2 MB instead of 12 MB, and seriously consider splitting your evidence across several smaller PDFs.
Frequently Asked Questions
What is the maximum file size USCIS accepts per upload?
USCIS currently allows 12 MB per file through myUSCIS, per the uscis.gov filing-tips page. Many older guides and forum posts cite 6 MB — that was the previous limit and you’ll still see it on a few legacy form-specific portals. The State Department’s NVC/CEAC portal, used for consular processing, is much stricter at 2 MB per file. Always confirm which portal you’re filing through before sizing your PDF.
Can I upload a JPG instead of combining everything into a PDF?
Yes — USCIS accepts JPG and JPEG, and some forms also accept TIF/TIFF. PNG is not on the general document-upload list (some photo-specific upload flows do accept it, but for evidence documents use PDF or JPG). That said, PDF is strongly preferred for any submission with more than one page: it bundles your evidence into a single file, preserves quality across mixed source types, and is much easier for an officer to review than a stack of separate JPGs. Use JPG for a single passport photo; merge to PDF for anything multi-page.
Will USCIS reject my application if my scans are blurry or low-resolution?
USCIS won’t auto-reject your whole application for one unclear page, but illegible documents are a leading cause of Requests for Evidence — which can add months to processing. Scan text documents at 300 DPI, and color documents with seals or photos (passports, marriage certificates) at 600 DPI. If you’re using a phone camera, hold the document flat, light it well, and check that every word is readable before you merge.
How do I combine receipts, tax returns, photos, and IDs into one PDF for USCIS?
Group by evidence category first — one PDF for financial evidence (tax returns, bank statements, pay stubs) and a separate PDF for relationship evidence (photos, joint accounts, lease) — then merge each group with the steps above. Keep each merged PDF under 12 MB. Use clear filenames the officer can match to your petition’s evidence list, e.g., Financial_Evidence_I130.pdf, not merged.pdf.
What if my combined PDF is still over the USCIS size limit after merging?
Three options, in order: drop the Quality Percentage slider in Advanced Options from 75 to 60–65 and re-merge; pre-shrink the source images using xconvert’s image compressor with Specific file size + Auto Scale (covered in Verify above); or split the evidence into two logically labeled PDFs and upload them as separate files in the same evidence slot — USCIS allows multiple files per slot.
Should I scan documents in color or is black-and-white OK for USCIS?
Color is needed for anything where color carries meaning — passports, official seals, holographic stamps, photos, green cards, marriage certificates. Grayscale is fine for purely text documents like letters, tax transcripts, bank statements, and typed affidavits. Grayscale files are roughly three times smaller, so use it where you can — but never strip color from a document where the color is part of the proof.
Is it safe to use a free online tool to merge immigration documents?
For xconvert specifically, your files are uploaded over TLS, processed on our servers, and automatically deleted after processing — we don’t retain, share, or access your documents, and no account is required. That’s the safest practical model for a free online tool. If you want a fully offline workflow (nothing leaves your machine), use a desktop application like LibreOffice or Adobe Acrobat instead. Avoid any tool that requires account creation or doesn’t clearly state its data-retention policy.
Try it now
Combine your USCIS evidence into a single compliant PDF with xconvert.com/merge-image-to-pdf. Use the settings table in §The exact xconvert settings for USCIS — they’re tuned for the 12 MB ceiling and the formats USCIS actually accepts. If your source photos are high-resolution and you want to pre-shrink before merging, start at xconvert.com/image-compressor with Specific file size and Auto Scale.
Related guides
- Compress PDF for SBA, IRS, and US Government Portals
- Compress TIFF for Email: Smaller Scans, Crisp Text
Sources
Last verified 2026-05-19.