 By James
You have a 6 MB photo from your phone and an upload form that chokes on anything over 2 MB. The instinct is to fear that shrinking it will wreck the picture — but a JPEG saved at quality 85 is usually impossible to tell apart from the same image at quality 100, while being a fraction of the size. The honest catch: JPEG is already a lossy format, so “compress without losing quality” really means “compress without losing visible quality.” This guide explains exactly how that works, the three levers that shrink a JPG (quality, dimensions, metadata), and how to apply them — verified against the IJG/libjpeg reference and the people who built the format.
Quick answer: A JPEG is already lossy, so you can’t shrink it with truly zero data loss — but you can shrink it with no loss your eye will notice. Three levers do the work: (1) lower the quality setting to about 75–85 (the IJG reference advises picking the lowest setting that’s “visually indistinguishable from the original” — its own default is 75); (2) resize the pixel dimensions if the image is bigger than it needs to be displayed; (3) strip metadata (EXIF/GPS/thumbnails). Do all three in one pass to avoid re-saving repeatedly, since each re-save adds a little generation loss.
Jump to a section
- Why “compress JPEG without losing quality” is a careful phrase
- Lever 1: the quality setting (the big one)
- Lever 2: resize the dimensions
- Lever 3: strip the metadata
- Generation loss: why you compress once, not five times
- Compress a JPG/JPEG on xconvert
- FAQ
Why “compress JPEG without losing quality” is a careful phrase
JPEG is a lossy image format. The moment a photo is first saved as a .jpg, the encoder has already thrown away data the algorithm judged to be visually unimportant — it groups pixels into 8×8 blocks, runs a discrete cosine transform, and quantizes (rounds off) the result. That rounding is where the savings — and the loss — come from.
So a phrase like “compress a JPEG with no quality loss” is, strictly, impossible: any further JPEG compression discards a little more information. What’s very much possible — and what the phrase really means in practice — is compressing it with no loss your eye can see. Because JPEG was designed around the limits of human vision, you can often cut a file to a third of its size before anyone could tell the difference in a side-by-side.
There are exactly three knobs that make a JPG smaller. The rest of this guide is about using each one well.
Lever 1: the quality setting (the big one)
Every JPEG encoder exposes a quality value, almost always on a 0 (worst) to 100 (best) scale. It controls how aggressively the quantization step rounds off detail. Lower the number and the file shrinks fast; raise it and the file grows while extra detail is preserved.
The single most useful piece of guidance comes from the reference JPEG implementation itself — the Independent JPEG Group’s libjpeg, the code underneath a huge share of the world’s JPEG tools. Its cjpeg documentation says:
“Normally you want to use the lowest quality setting (smallest file) that decompresses into something visually indistinguishable from the original image. For this purpose the quality setting should be between 50 and 95; the default of 75 is often about right.”
A few practical takeaways from that:
- 75 is the reference default, and it’s “often about right” for photographs. It is not a low or aggressive setting — it’s the balanced middle.
- The useful range for photos is 50–95. Below 50 you start risking visible blocking and color smearing; above 95 the file grows quickly for detail almost no one perceives.
- There is no single “correct” number — it depends on the image and how it’ll be viewed. A detailed landscape tolerates more compression than a flat gradient or a screenshot with sharp text.
A pragmatic recipe: start around 80–85, look at the result at the size it’ll actually be displayed, and only drop lower if the file is still too big and the picture still looks clean. Quality 75–85 is the sweet spot where most photos look identical to the original to most eyes while being dramatically smaller than a quality-100 save.
Why does the eye forgive so much? Partly because JPEG also applies chroma subsampling — it keeps full detail in brightness (luma) but throws away half or three-quarters of the color (chroma) resolution. The human visual system is far more sensitive to brightness than to fine color variation, so this is largely invisible in photographs (though it can soften sharp colored edges and on-screen text). It’s the same trick that makes the quality slider so forgiving.
Lever 2: resize the dimensions
The quality slider is about how much detail to keep per pixel. Resizing is about how many pixels you keep at all — and it’s the lever people forget.
A modern phone shoots 12-megapixel or larger images — roughly 4000×3000 pixels. If that photo is going to be displayed in an email, a forum avatar, or a 1200-pixel-wide blog column, you’re storing several times more pixels than will ever be shown. Halving each dimension cuts the pixel count to a quarter, and the file size usually falls by a similar proportion — before you touch the quality slider.
The rule of thumb: resize to the largest size the image will actually be viewed at, then compress. For most web and email uses, a longest edge of 1600–2000 px is plenty; for an inline email image, often less. This is the highest-leverage move when a file is enormous, and it loses nothing you’d ever see, because you weren’t going to display those extra pixels anyway. For a full walkthrough of choosing dimensions for the web, see How to Resize an Image for the Web.
Lever 3: strip the metadata
Photos carry metadata — EXIF tags recording the camera model, lens, exposure, GPS location, timestamps, and often an embedded thumbnail and color profile. On a heavily compressed small JPG, that metadata can be a non-trivial slice of the file, and an embedded thumbnail or color profile adds kilobytes you rarely need.
Stripping it does zero damage to the visible image — it removes information about the photo, not the photo itself. As a bonus, it removes the GPS coordinates that would otherwise tell anyone where the picture was taken, which is a genuine privacy win when you’re posting publicly. The only time to keep metadata is when you specifically need it — for cataloguing, copyright/IPTC tags, or color-managed print workflows.
Generation loss: why you compress once, not five times
Here’s the trap that quietly degrades photos. Because JPEG is lossy, every time you open a JPEG and re-save it as JPEG, the entire lossy pipeline runs again — DCT, quantization, rounding — and a little more detail is lost. Engineer Jon Sneyers (a JPEG XL co-creator) calls it the photocopier effect: re-saving a JPEG is like photocopying a photocopy. Do it enough times and you get visible blurring, blocking, and color shifts — the same cumulative damage behind Why Is My JPEG Blurry After Saving?.
Two consequences worth internalizing:
- Re-saving at a higher quality doesn’t undo loss. Taking a quality-70 JPEG and re-saving it at 90 just makes a bigger file with more loss — the detail discarded at 70 is gone for good and can’t be recovered.
- Compress in one pass. Whenever possible, start from the highest-quality original (or a lossless master like PNG/TIFF) and apply your quality, resize, and strip choices in a single export. That keeps you to one generation of loss instead of stacking several.
This is why a tool that lets you set quality, dimensions, and metadata together in one step beats opening, tweaking, and re-saving the same JPG repeatedly.
Compress a JPG/JPEG on xconvert
The xconvert JPEG compressor puts all three levers in one pass, so you compress once and avoid generation loss:
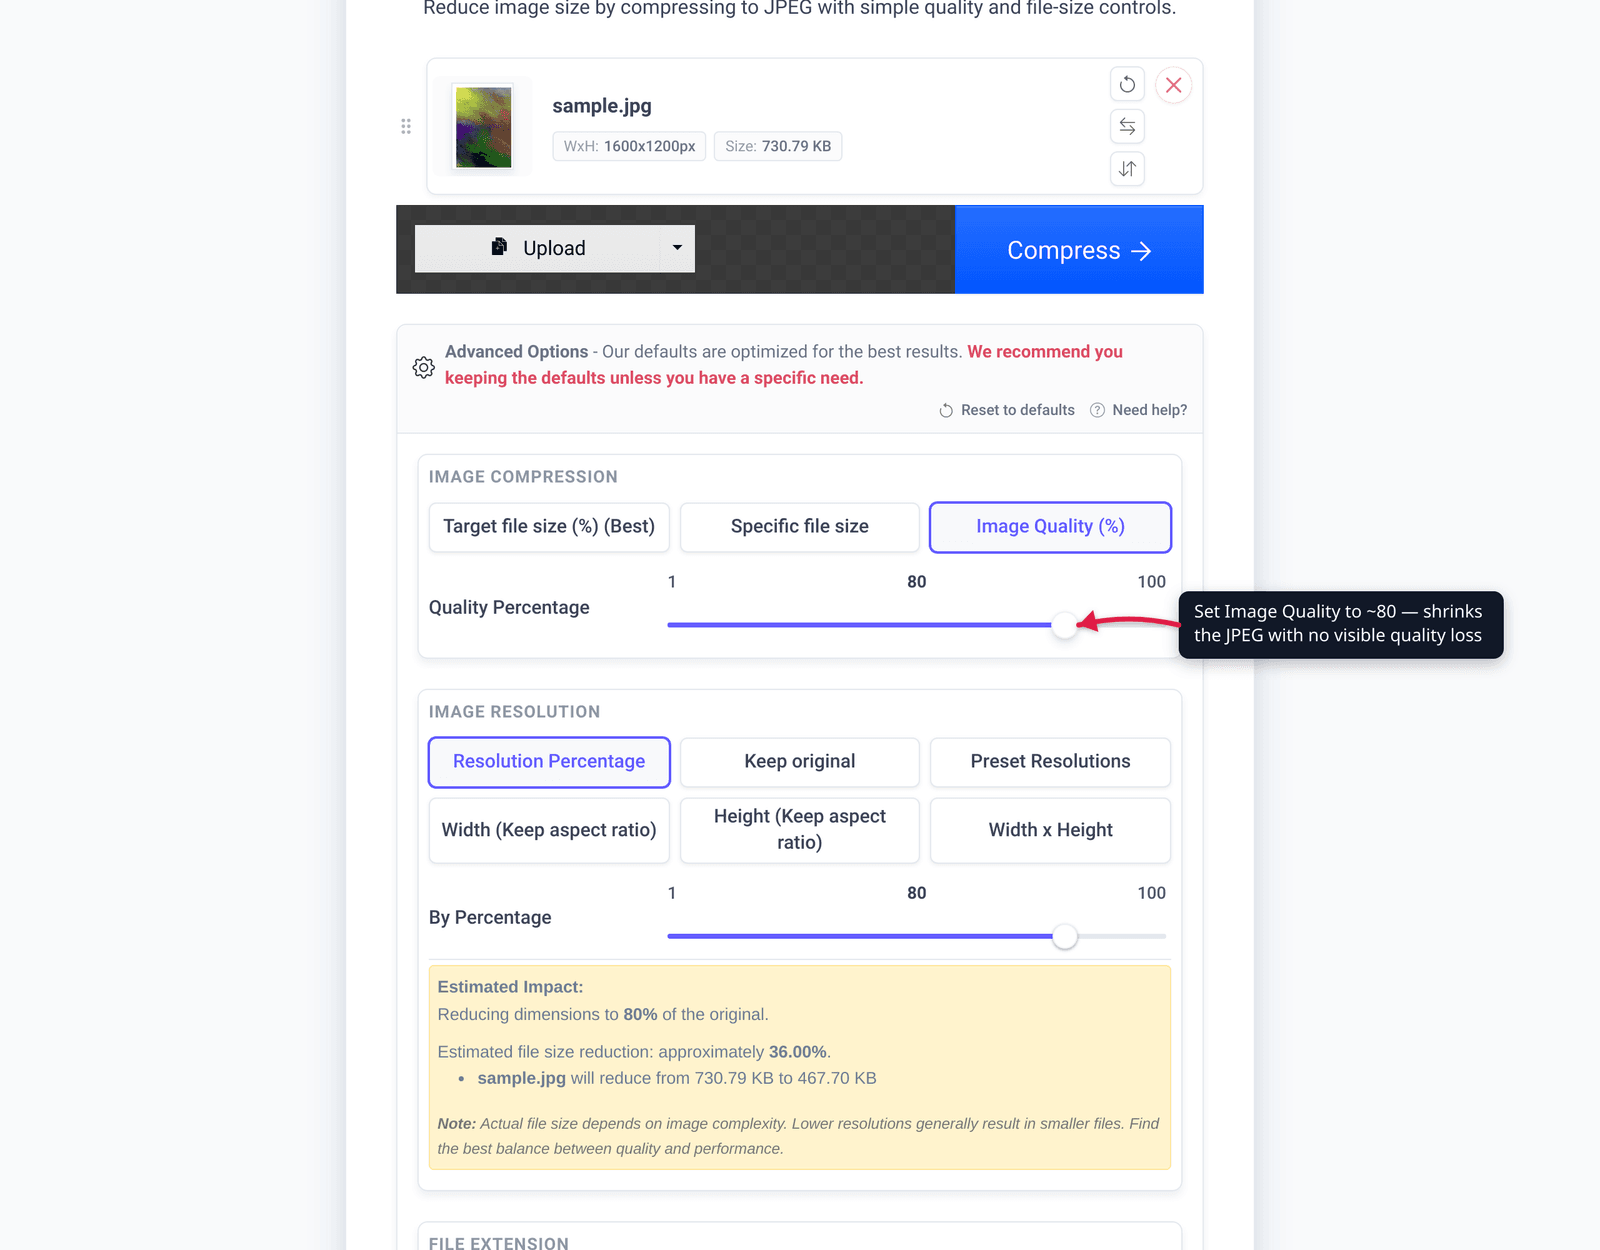
- Open xconvert.com/compress-jpeg and click Upload to add your image (from your computer, Google Drive, or Dropbox).
- Open Advanced Options (the gear icon). The defaults are tuned for a good balance, so you can change just what you need.
- Choose how to control size. There are three methods: Target file size (%) (marked Best — shrink by a percentage), Specific file size (enter an exact target in MB/KB), or Image Quality (%) (set the quality slider directly — try 80–85 for a visually clean result).
- Leave Smart Scaling / Auto Scale on to let the tool right-size the dimensions, or set your own — resizing is the biggest win when the image is far larger than it’ll be displayed.
- Keep the output extension on Same as source (or pick JPEG / JPG), then click Compress and download.
Your file uploads over an encrypted connection, is processed on our servers, and is automatically deleted a few hours later. Nothing stays around.
If your goal is specifically getting a photo under an email limit, How to Compress Photos for Email walks through targeting Gmail/Outlook caps.
FAQ
Can you really compress a JPEG without losing any quality?
Not with zero data loss — JPEG is already a lossy format, so any further JPEG save discards a little more information. But you can absolutely compress it with no loss you can see. A quality setting around 75–85 is typically indistinguishable from the original to the human eye while being far smaller, which is what “without losing quality” means in practice.
What JPEG quality setting should I use?
The IJG/libjpeg reference recommends 50 to 95 for photographs, with 75 as a sensible default, and advises using the lowest setting that still looks indistinguishable from the original. A practical starting point is 80–85: high enough to look clean, low enough to shrink the file substantially. Drop lower only if the file is still too big and the image still looks fine.
Will lowering the quality make my photo blurry?
Not at a sensible setting. Visible blurring, blocking, and “mushiness” appear when you push quality very low (well under 50) or when you re-save the same JPEG many times. At quality 75–85 in a single save, the result looks the same as the original to most people. See Why Is My JPEG Blurry After Saving? for the full cause-and-fix.
Does re-saving a JPEG at higher quality improve it?
No. Detail discarded by an earlier compression is gone permanently — re-saving at a higher quality just produces a larger file with more cumulative loss, not a better-looking image. Always work from the highest-quality original you have, and export to JPEG once.
What’s the difference between JPG and JPEG?
None — they’re the same format. “JPG” exists only because older Windows/DOS file systems limited extensions to three characters, so .jpeg was shortened to .jpg. They’re identical files; you can rename one to the other.
Is resizing or lowering quality better for shrinking a JPG?
Use both, but resize first when the image is much larger than it’ll be displayed — cutting the pixel dimensions is the biggest single saving and costs you nothing visible, since you weren’t going to show those extra pixels. Then lower the quality setting to fine-tune the file size. Doing both in one pass avoids stacking generation loss.
Sources
Last verified 2026-06-25.
- IJG libjpeg-turbo — cjpeg manual page — authoritative quality scale (0–100), default 75, recommended 50–95 range, and the “lowest setting visually indistinguishable from the original” guidance.
- IJG libjpeg-turbo — libjpeg.txt — confirms the 0…100 IJG quality scale and the default-75 quantization tables.
- Cloudinary — “Why JPEG is like a photocopier” (Jon Sneyers) — generation loss / photocopier effect, and that re-saving at higher quality is counterproductive.
- Image Engineering — How does JPEG compression work? — the DCT + quantization + subsampling pipeline that makes JPEG lossy.
- Wikipedia — Chroma subsampling — why discarding color resolution (4:2:0) is largely invisible: the eye is more sensitive to brightness than color.